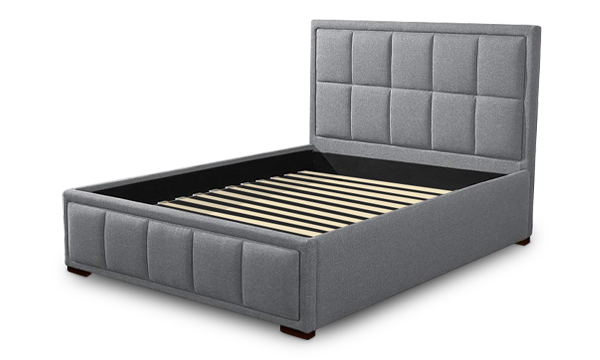
In the quest for more space and comfort in our homes, the bedroom often becomes a focal point for innovation. An elevated bed frame not only offers a modern, minimalist look but also utilizes the often-wasted space beneath the bed.
Whether you’re seeking extra storage or simply aiming to elevate your sleep literally and figuratively, building a DIY elevated bed frame can be a rewarding project for any homeowner.
Why Opt for an Elevated Bed Frame?
- Space Maximization: Utilize under-bed space for storage, making it perfect for small apartments or rooms.
- Aesthetic Appeal: An elevated frame can add a modern touch to any bedroom.
- Improved Airflow: Elevating your mattress can enhance airflow, contributing to a cooler sleep environment.
How to Build an Elevated Bed Frame
Building an elevated bed frame is a fantastic project for those looking to add extra storage space beneath their bed, improve airflow around their sleeping area, or simply inject a custom aesthetic into their bedroom. Here’s a guide to constructing your elevated bed frame, ensuring it’s both sturdy and stylish.
Tools and Materials Needed:
- Lumber: Quantity and dimensions depend on your bed size (e.g., Twin, Full, Queen, King) and desired height.
- Measuring Tape: For accurate measurements.
- Circular Saw or Hand Saw: To cut lumber to size.
- Drill: With various drill bits for making pilot holes and driving screws.
- Screws: Wood screws to assemble the frame.
- Sandpaper or Electric Sander: For smoothing cut edges and the finished frame.
- Paint or Stain: Optional, for finishing the bed frame.
- Level: To ensure your frame is perfectly horizontal.
- Safety Equipment: Safety goggles and gloves for protection.
Step 1: Design and Planning
- Dimensions: Decide on the dimensions of your bed frame. Consider the size of your mattress and the height you want your bed to be elevated.
- Sketch: Create a rough sketch of your design, noting where support beams and slats will go. This will be your guide throughout the construction process.
Step 2: Cutting Your Lumber
- Based on your design, cut your lumber to the required lengths for the frame, supports, and slats. Remember, the legs will determine the height of your elevation, so cut these pieces according to how high you want your bed to be.
Step 3: Assembling the Frame
- Legs and Sides: Start by constructing the outer frame and attaching the legs. If you’re aiming for significant elevation, ensure the legs are securely attached with both glue and screws for extra stability.
- Support Beams: Install horizontal support beams across the length and width of the frame. These beams will need to support the mattress’s weight, so use sturdy lumber and secure them well.
- Slats: Space wooden slats evenly across the top of the frame. These slats should be close enough to support your mattress without any sagging.
Step 4: Sanding and Finishing
- Once assembled, sand the entire frame to remove any rough edges or splinters. If you choose to paint or stain your frame, do so after sanding and allow it to dry completely.
Step 5: Final Assembly and Checks
- Level and Secure: Place the frame in its intended spot and use a level to check that it sits flat. Make any necessary adjustments to ensure stability.
- Mattress Placement: Lay your mattress on top of the slats and make any final adjustments to the frame to accommodate it properly.
Coupling your DIY elevated bed frame with a high-quality Puffy Lux Mattress can significantly enhance your sleep experience, ensuring both comfort and support.
Building an elevated bed frame from scratch might seem daunting at first, but with careful planning, the right tools, and a bit of elbow grease, it’s a project that can greatly enhance the look and functionality of your bedroom. Not to mention, the satisfaction of sleeping on a frame you built yourself is unbeatable.
Check out Puffy mattress reviews from real customers and see how we compare with other brands.
Additional Tips
- Storage: Consider adding drawers or shelves beneath the frame for added storage. This can be done by attaching additional lumber or pre-made storage solutions to the frame.
- Headboard and Footboard: For a more finished look, attach a headboard and footboard to your frame. These can be made from matching lumber or by repurposing other furniture pieces.
Building our DIY elevated bed frame became a weekend project that not only added functionality to our bedroom but also became a centerpiece of personal pride. From selecting the perfect wood grain to choosing a stain that complemented our decor, every step brought us closer to realizing our vision. The added storage space beneath the bed was a game-changer for our organization, transforming our bedroom into a sanctuary of calm and order.
Pairing your newly crafted elevated bed frame with a quality Puffy Lux Mattress can significantly enhance your sleep experience. The right mattress will complement the frame’s height and support, ensuring a restful night’s sleep.
Use our store locator to find the closest furniture or mattress store near you and feel the cloudlike comfort of our Puffy Mattress in person.
Conclusion
A DIY elevated bed frame is more than just a piece of furniture; it’s a statement of style and a testament to the ingenuity of home DIY. With the right tools, materials, and a bit of creativity, you can transform your bedroom into a space that is both functional and stylish.

- Premium stitching.
- Heavy-duty wooden frame.
- Lifetime warranty.
- 101-night sleep trial.
- Free shipping and returns.


